How to Edit a Podcast in Audacity in 2023
13 minutes read
podcastseditingaudacity
Thanks for visiting! 👋
Learn how to use Audacity to take your podcasting game to the next level.
Audacity is a free and open-source audio editing software that offers a wide range of tools and features to help you edit your podcast like a pro.
In this step-by-step guide, we'll walk you through the process of editing a podcast episode in Audacity, covering everything from recording and importing audio clips to cutting out unwanted noise and adding intro and outro music.
Let's get started!
Table of Contents
- What is Audacity and What Benefits Does it Offer for Podcast Editing?
- Editing Your Episode's Recording Using the Tools within Audacity
- Exporting Your Finished Podcast Episode from Audaciy
- Next steps
What is Audacity and What Benefits Does it Offer for Podcast Editing?
Lets start with a refresher in case that you are still not so sure about using Audacity for editing your podcast.
Audacity is a free audio editing app that is available for Windows, Mac, and Linux.
This powerful tool offers a wide range of features for podcast editing, including the ability to cut, copy, and paste audio clips, adjust the volume and equalization of individual tracks, and add effects like reverb and noise reduction.
Additionally, Audacity supports a variety of file formats, including MP3, WAV, and AIFF, making it easy to import and export audio files for use in other applications.
Some of the benefits of using Audacity for podcast editing include its relative ease of use, flexibility, and the fact that it is free forever.
Record your audio in Audacity or import audio clips
Let's get right to the meat of it. If we want to produce a podcast episode first we need to either:
- Record the audio within Audacity
- Import the audio you recorded in another platform into Audacity
How to record audio directly in Audacity
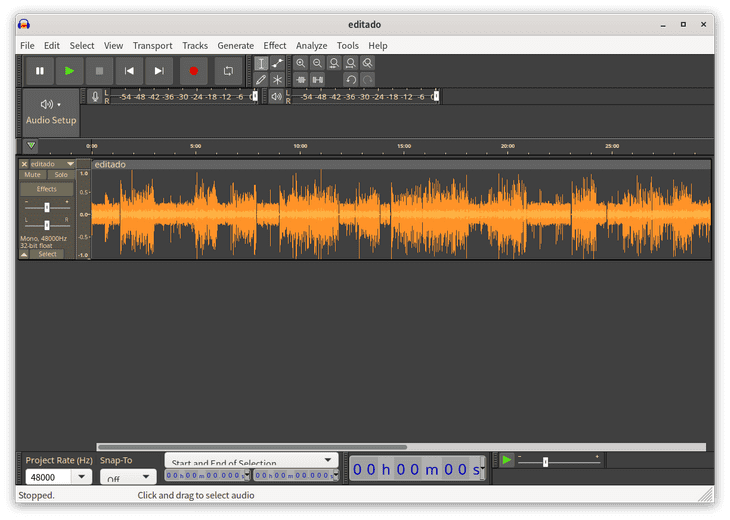
To record audio directly in Audacity, simply open the program and click the red "Record" button on the toolbar. Once you are finished recording, click the "Stop" button. The recorded audio will appear as a new track in the Audacity project window.
We recommend that while recording you use headphones to listen to yourself so you have an idea of how the audio will turn out. Also, while recording make sure the input level volume is not too high nor to low. You can verify this headphones and also by looking at the wave diagram on Audacity.
If there are multiple participants in your podcast, ideally you would record with separate microphones for each participant so that each participant has their own separate audio track. However, this is not a must.
How to import your existing podcast audio clips into Audacity
For this you have two options:
- To import existing audio files into Audacity, go to the "File" menu and select "Import" and then "Audio." Navigate to the location of the audio file you want to import and select it. The audio file will appear as a new track in the Audacity project window.
- Drag and drop the audio file to the Audacity interface, this will also import the audio file into the program.
Ideally if your podcast's episode contains various participants each of them has been recorded on separate tracks. This will make many editing tasks much simpler.
Once you have your audio clips ready within Audacity, we are ready to actually edit.
Continue onto the next section were we address how to do some of the most common podcast editing tasks.
Editing Your Episode's Recording Using the Tools within Audacity
If you are not familiar with audio editing here we will give you a brief overview of some of the most common podcast editing tasks and how to accomplish them so you can get an idea of which tasks might be appropriate for your podcast. If you already know which editing tasks you need, you can jump directly to the sections you need.
Without further ado, here are few basic steps for editing a podcast episode using the tools within Audacity:
- Trim unwanted audio: Use the "Selection Tool" to select the unwanted portion of the audio and then press the "Delete" key to remove it.
- Adjust the volume: Use the "Envelope Tool" to adjust the volume of specific parts of the audio. You can also use the "Amplify" effect to adjust the overall volume of the audio.
- Add fades: Use the "Fade In" and "Fade Out" effects to smoothly transition audio in and out.
- Remove noise: Use the "Noise Reduction" effect to remove background noise from the audio.
- Add background music or sound effects: Use the "Import" function to import additional audio files, then use the "Selection Tool" to place them in the desired location in the audio track.
- Edit the audio clip: Use the "Cut", "Copy", "Paste" and "Silence" tool to edit audio clip as desired.
- Export your podcast episode: Once you are satisfied with your edits, use the "Export" function to save the audio as a new file in the desired format, such as MP3 or WAV.
In the following sections we will explain more in-depth about some of these editing tasks and how to improve the overall quality of your audio to produce a high quality podcast that people will want to listen and share!
Common Podcast Editing Tasks
Adding intro and outro music

Adding intro and outro music to a podcast episode in Audacity is a simple process.
- Open the intro music file in a new Audacity project.
- Select the entire audio track by clicking and dragging your cursor over it or by pressing "Ctrl+A"
- Copy the audio track by pressing "Ctrl+C" or by going to "Edit > Copy"
- Switch back to the podcast episode project and place your cursor at the beginning of the audio track.
- Paste the intro music by pressing "Ctrl+V" or by going to "Edit > Paste"
- Use the "Time Shift Tool" to adjust the timing of the intro music, if necessary.
- Repeat the process to add outro music: Open the outro music file in a new Audacity project, select the entire audio track, copy it, switch back to the podcast episode project, place your cursor at the end of the audio track, paste the outro music and adjust the timing if necessary.
- Use the "Envelope Tool" to fade in the intro music, and fade out the outro music, this will make the transition between the podcast episode and the music smoother.
- Play back the audio to ensure that the intro and outro music sound natural and seamless with the podcast episode.
It's worth noting that you can also add an intro and outro music as a separate track to Audacity and then use the "Time Shift Tool" to adjust the timing of the music to match the podcast episode.
If you don't have any clips your intro or outro yet there are a number of websites that offer free music for podcasts, including:
Be sure to check the terms of use for each site, as some may require attribution or have other restrictions on use. Additionally, please note that it is important to use only music for which you have the legal right to use, such as music that is in the public domain or licensed under a Creative Commons license.
Removing filler words and "umms" and "ahhs"
Removing "umms" and "ahhs" from audio in Audacity can be done using the "Edit > Cut" or "Edit > Delete" command. Here's how to do it:
- Open the audio file in Audacity.
- Use the "Selection Tool" to select the section of the audio that contains the "umms" or "ahhs".
- Press "Delete" or "Cut" key to remove the selected section of audio.
- Use the "Time Shift Tool" to move the remaining audio segments together to close the gap.
- Repeat steps 2-4 for any other sections of the audio that contain "umms" or "ahhs".
- Play back the audio to ensure that it sounds smooth and natural after the removal of "umms" and "ahhs".

We recommend not overdoing it with this kind of edits because they can become very time-consuming and frustrating, especially if if there are many instances of "umms" and "ahhs". Removing filler words could also make a podcast sound unnatural. Sometimes its completely fine to leave these filler words.
Alternatively, you can use the "Silence Finder" tool which is a built-in feature of Audacity that automatically detects and marks sections of silence in an audio file. This can be used to quickly identify "umms" and "ahhs" for removal. Once you've identified the sections you want to remove, you can use the steps mentioned above to delete them.
At Caproni we are adding a tool that can automatically remove "umms", "ahhs" and other filler words from your podcast episodes. Let us know if you are interested in the comments below!
Noise Removal and Reduction
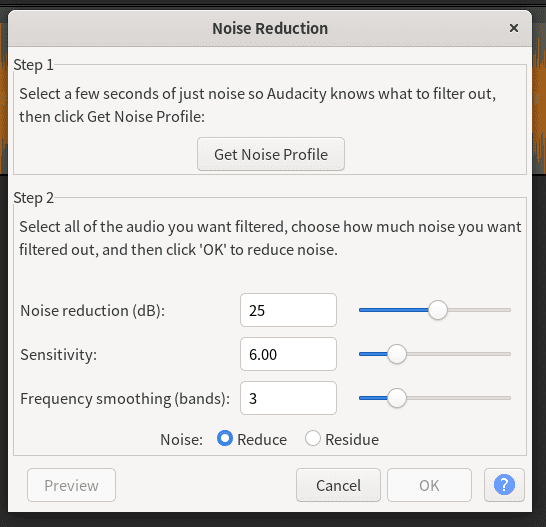
The "Noise Reduction" tool in Audacity can be used to eliminate common noises such as phone rings and dog barks. Here's how to use it:
- First, you'll need to select a section of the audio that contains only the noise you want to remove. This is called the "noise profile". Make sure that the section you select is at least a few seconds long and that it contains a representative sample of the noise you want to remove.
- Go to the "Effect" menu and select "Noise Reduction."
- In the "Noise Reduction" window, click on the "Get Noise Profile" button. This will create a noise profile based on the selected section of audio.
- Next, select the entire audio track that you want to process.
- Go to the "Effect" menu again and select "Noise Reduction."
- In the "Noise Reduction" window, adjust the "Noise reduction" and "Sensitivity" sliders to control how much noise is removed. The "Noise reduction" slider controls the amount of noise reduction applied to the audio, while the "Sensitivity" slider controls how aggressively the noise reduction algorithm identifies and removes noise.
- Click on "OK" to apply the noise reduction to the selected audio.
- Listen to the audio and adjust the settings as needed.
It's important to note that noise reduction can also remove some of the desired audio, so be careful not to overdo it. After applying Noise Removal you can listen to the end result and undo and retry if need be.
It is possible that within your audio clips you do not have a section where the noise is isolated enough to be able to use it for a noise profile. In that case, you could experiment with searching online for an audio clip to use as the noise profile. For example, if the noise is a a common ringtone you can search for that ringtone online.
Improving audio quality
Loudness normalization
Loudness normalization is the process of adjusting the loudness of an audio file to a standard level.
This makes the volume of the podcast more even which lets people enjoy the episodes without having to adjust the volume.
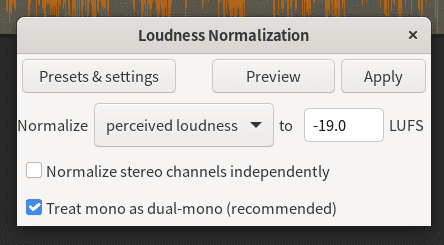
Here's how to apply loudness normalization to a podcast episode in Audacity:
- Choose all of your audio tracks by clicking on the "Select" menu and then "All
- Click on the "Effect" menu and choose "Loudness Normalization"
- Choose the following settings:
- Click on "Apply"
You may have noticed the value of "-19.0" LUFS. This is not an arbitrary value. Although there is no strict standard for volume levels in podcast, there is one for radio. This value is the same as the radio standard which is used by many podcasts. For more details about that standard and loudness normalization in gneral checkout this article about why your podcast needs loudness normalization.
Equalizer settings
Equalization (EQ) is the process of adjusting the balance of different frequency components in an audio signal.
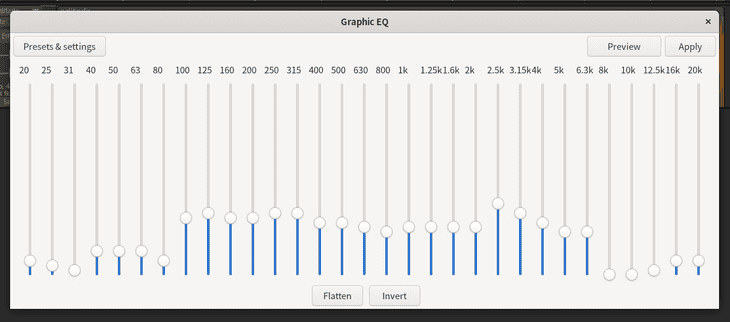
Using the equalizer is useful to improve the audio quality of a podcast. The equalizer is especially useful for remote interviews since a host can't control a guest's recording setup. You can for example improve clarity of the audio track of a guest. Audacity fully supports this.
Good equalizer settings for a podcast will depend on the specific characteristics of the audio and the desired outcome, but here are a few general guidelines:
- Reduce low-frequency noise: Use a low-cut filter to remove unwanted low-frequency noise, such as hum or rumble, which can be caused by electrical interference. A cut-off frequency of around 80-100Hz is usually a good starting point.
- Enhance speech intelligibility: Boost the frequencies around 4-6kHz, which can help to make speech more clear and understandable.
- Add warmth to the voice: Boosting the frequencies around 300-500Hz can add warmth and richness to the voice, making it sound more natural and pleasant.
- De-emphasize sibilance: High-frequency sibilance (the "s" and "sh" sounds) can be reduced by cutting the frequencies around 8-10kHz.
- Add stereo width: To give the podcast a more spacious and natural sound, you can use the stereo width effect to increase the difference in level between the left and right channels.
To set equalizer settings in Audacity, you can use the "Equalization" effect, which can be found in the "Effect" menu. You can choose from several preset EQ curves or create a custom curve by adjusting the gain of specific frequency bands. It's always a good idea to listen to the audio carefully and make small adjustments to the EQ settings until you achieve the desired result.
For more in depth coverage about equalization you can use the following resources:
- This tutorial discusses equalizing techniques in greater detail
- This article shows how to apply these techniques using Audacity
Exporting Your Finished Podcast Episode from Audaciy
We recommend exporting your completed episode in MP3 format using the following Audacity settings:
- Bit rate mode: Preset
- Quality: Medium
- Channel Mode: Force export to mono

These settings are meant to maximize audio quality while reducing file size. The benefits of having smaller file sizes for podcast episodes include:
- Listeners will be able to listen smoothly even if they have a bad internet connection
- In case that a listener decided to download an episode to listen offline, it will take less space on the listener's phone.
To export an edited podcast episode from Audacity, follow these steps:
- Go to the "File" menu and select "Export" and then "Export as MP3".
- Choose a location to save the exported file, and give it a name.
- Choose the settings we recommended above or whichever settings you need.
- Click on "Save" to start the exporting process.
- Once the export process is complete, the exported audio file will be saved to the location you specified, and you can now use it to upload to your podcast hosting service or share it with others.
It's worth noting that If you have multiple tracks in your project, you will need to make sure that the tracks you want to export are not muted and that their levels are set correctly before you export the final file.
Next steps
Stop procrastinating and begin exploring Audacity to elevate your podcast! Even if you're new to audio editing, the key is to start and maintain your motivation. As you progress, you can continue to learn and improve. Need assistance? Schedule a complimentary consultation with a podcasting expert by visiting [https://cal.caproni.fm/demo] and let's take your podcast to the next level!
Once you have your audio file exported and ready to publish you can use Caproni to make sure it reaches all of the major podcast platforms and directories.
Thanks for reading till the end!
